I will never forget the backyard barbecue that almost burned my reputation as the family cook to a crisp.
A couple of summers back, I saw a short video showing these jaw-dropping “smoked onion bombs”—whole hollowed-out onions packed with seasoned beef, wrapped in bacon, slathered in barbecue sauce, and thrown onto a screaming grill. It looked so easy. I bought six giant yellow onions, scooped out the insides with a metal spoon, shoved raw ground beef directly into the cavity, topped them with grocery-store shredded cheddar, tossed them right over direct coals, and shut the lid.
Thirty minutes later, my patio looked like a smoke grenade had gone off.
The direct flames had incinerated the outer onion skins into pitch-black ash, while the centers remained stubbornly raw, pungent, and crunchy. Worse, the expanding beef fat had bubbled out and caused massive flare-ups that charred the bacon bits on top into bitter charcoal. When my brother cut into his onion, the ground beef in the middle was still raw and cold. We literally threw all six in the trash and ended up grilling emergency hot dogs.
I was furious, but the core idea was just too brilliant to abandon: a naturally sweet, charred onion acting as an edible roasting vessel for juicy, smoky cheeseburger filling, crispy bacon crumbles, and molten sharp cheddar.
It took me four weekends of tinkering with foil packets, butcher tricks, and heat zones to realize the secret: you have to steam-braise the onions first before crisping the tops.
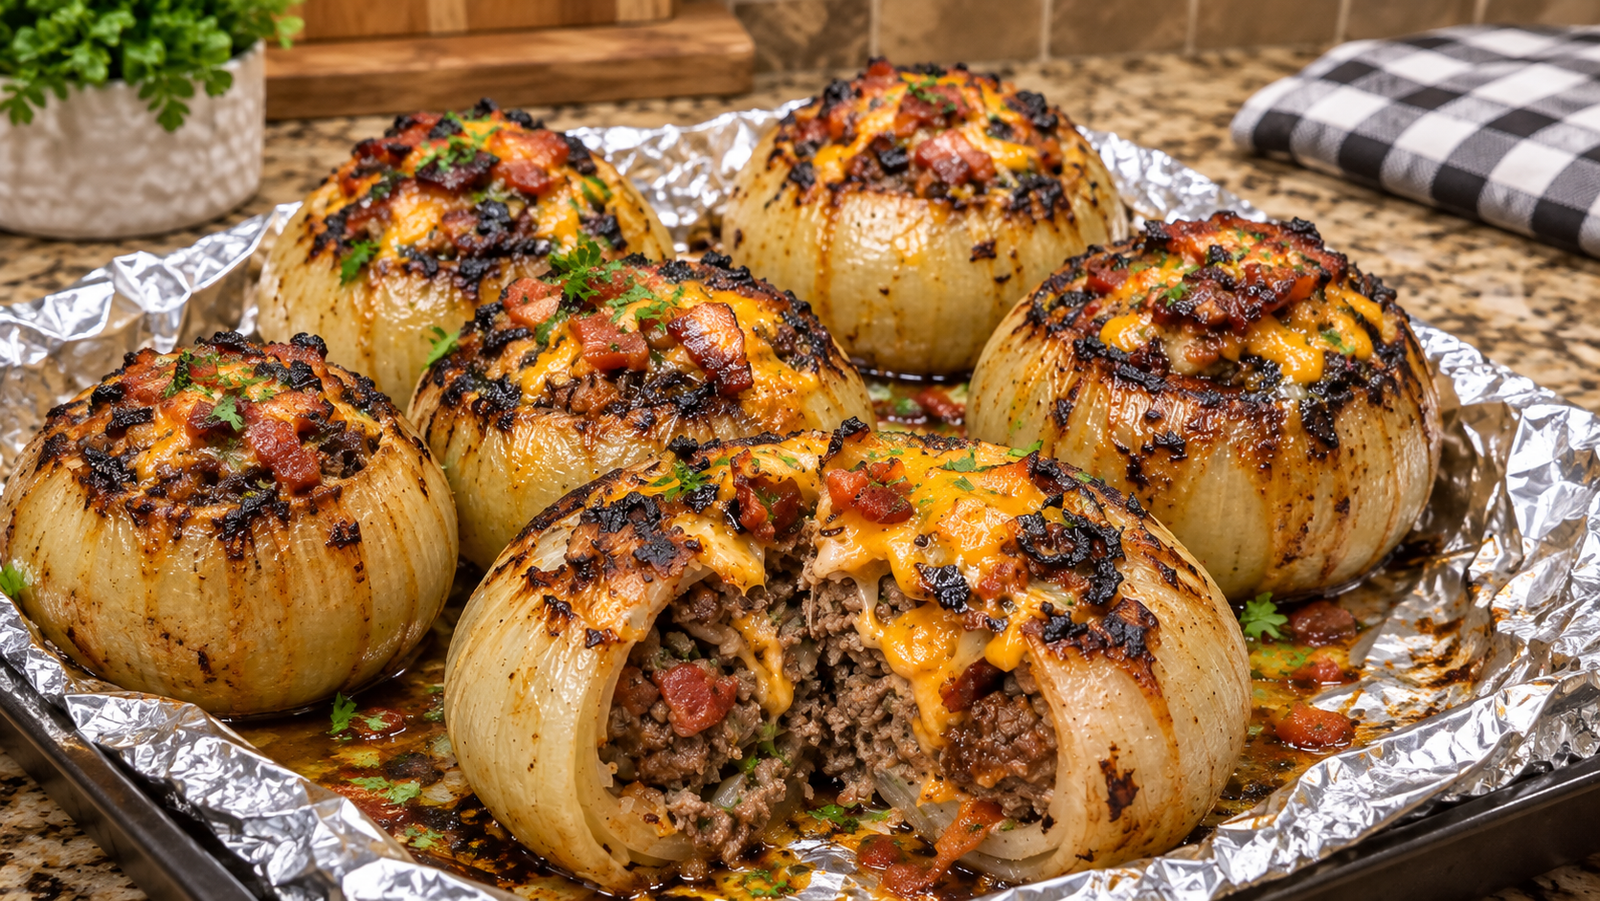
The photo above is the delicious reality: tender, caramelized, fork-tender sweet onions roasted until sweet and charred along the rim, packed with juicy seasoned ground beef, molten sharp cheddar, and crispy bacon nuggets that stay juicy down to the last bite.
Here is how you make these legendary Stuffed Onion Bombs at home—whether on a grill or right in your kitchen oven—without scorching your dinner.
Why Most Stuffed Onion Bombs Fail (The Physics of the Onion)
An onion is composed of dense, water-heavy concentric rings. When you hollow one out and fill it with ground meat, you are pairing two ingredients that cook at completely different speeds:
1. The Direct-Heat Scorching Mistake
If you place whole raw onions over direct flame or high oven heat, the thin outer paper-like layer chars within ten minutes, long before the radiant heat can penetrate the center to cook the raw beef. Wrapping the stuffed onions in heavy-duty aluminum foil creates a mini-convection steam chamber. The steam softens the dense onion layers from the outside in, turning them sweet and buttery while cooking the ground chuck through gently.
2. Leaving Only One Onion Layer
When hollowing out an onion, beginners often scoop out everything until only the paper-thin outer ring remains. That single ring tears and collapses under the weight of the meat, spilling the beef and molten cheese all over the grate or baking sheet. You must leave two to three sturdy outer layers intact to form a strong, structural bowl that holds its shape under intense heat.
3. The Cheese Expansion Problem
If you cram shredded cheese into the raw beef mixture from minute zero, the dairy fat will separate and boil out as the beef contracts. The trick is to season and pack the ground meat into the onion, braise it until the meat reaches safe temperature, and then crown the opening with extra sharp cheddar and par-cooked bacon during the final broiling or un-tented stage so it melts into that gooey, blistered volcanic top.
Ingredients & Tools You’ll Need
Essential Gear
- Heavy-Duty Aluminum Foil: Regular flimsy foil will tear against the grill grates or pan; heavy-duty foil locks in steam and pan juices without leaking.
- Melon Baller or Sturdy Teaspoon: The easiest tool to core and scoop out the onion centers without puncturing the bottom wall.
- Instant-Read Digital Meat Thermometer: (A ThermoWorks ThermoPop or similar digital probe ensures the beef hits a safe 160°F in the center).
- Rimmed Baking Sheet or Grill-Safe Tray: For holding the foil-wrapped bombs whether cooking in an oven or on a gas/charcoal grill.
The Ingredient Breakdown
| Component | Ingredient | Quantity | Practical Purpose |
| The Edible Bowls | Large Sweet Vidalia or Yellow Onions | 4 to 5 large (uniform in size) | Thick walls sweeten and caramelize into buttery edible vessels. |
| The Burger Filling | 80/20 Ground Chuck | 1.5 lbs (700g) | The perfect fat ratio to keep the interior juicy inside the onion bowl. |
| The Crunch Crown | Thick-Cut Smoked Bacon | 5 to 6 strips (diced and par-cooked) | Topped across the cheese for smoky, crispy bacon-burger flavor. |
| The Molten Blanket | Sharp Cheddar Cheese | 1.5 cups (freshly shredded or cubed) | Melts into a gooey, savory crown that seals the beef inside. |
| Moisture Anchor | Plain Panko Breadcrumbs | ⅓ cup | Cushions the beef proteins so the meat stays tender, not rubbery. |
| Flavor Binder | Large Egg | 1 whole | Lightly beaten to hold the seasoned meat filling together. |
| Savory Boosters | Worcestershire Sauce | 1.5 tbsp | Adds fermented steakhouse umami directly to the beef. |
| Sweet Glaze Touch | Smoky BBQ Sauce | 3 tbsp (plus extra for topping) | Blended into the beef and brushed over the top before crisping. |
| Aromatic Base | Reserved Diced Onion Cores | ½ cup (finely minced) | Sautéed and mixed into the beef filling so nothing goes to waste. |
| Aromatic Base | Fresh Garlic | 3 cloves (minced) | Delivers punchy savory depth throughout the meat. |
| Steakhouse Rub | Smoked Paprika & Garlic Powder | 1 tsp each | Colors and seasons the interior beef mix. |
| Steakhouse Rub | Onion Powder & Dried Oregano | ½ tsp each | Earthy seasonings that bloom inside the steam packet. |
| Seasoning | Coarse Kosher Salt & Cracked Pepper | 1.5 tsp salt, 1 tsp coarse pepper | Crucial seasoning across the beef and outer onion skins. |
| Cooking Fat | Unsalted Butter | 2 tbsp (melted) | Brushed over the onion exteriors before wrapping to encourage browning. |
Step-by-Step Cooking Instructions
Step 1: Prep and Hollow the Onions
Slice off the top half-inch of each onion so you have a flat, wide opening.
Carefully trim just a razor-thin sliver off the root bottom so the onion can sit flat on a table without rolling over (be careful not to slice through the bottom base entirely, or your meat juices will leak out). Peel off the papery, dry outer skins.
Using a melon baller or a sturdy metal teaspoon, gently scoop out the interior rings of each onion.
Work slowly from the center outward.
The Golden Rule of Hollowed Onions: Leave at least 2 to 3 thick outer layers intact (roughly ⅓- to ½-inch thickness all around). If the walls are too thin, they will tear under the weight of the meat.
Take the scooped-out onion centers and finely mince about ½ cup of them to use in our burger filling (stash the rest in the fridge for future soups or sauces).
Step 2: Par-Cook the Bacon
Place a skillet over medium heat and cook the chopped thick-cut bacon for 5 to 6 minutes until lightly crisp and golden.
Transfer the bacon pieces with a slotted spoon to a paper-towel-lined plate.
Leave 1 tablespoon of bacon drippings in the skillet. Toss in the ½ cup of finely minced onion centers and cook for 3 minutes until soft and translucent.
Stir in the minced garlic for 60 seconds until fragrant. Remove from heat and let cool for 5 minutes.
Step 3: Mix the Cheeseburger Filling
In a large mixing bowl, whisk together the beaten egg, panko breadcrumbs, 1.5 tablespoons Worcestershire sauce, 3 tablespoons barbecue sauce, 1.5 teaspoons kosher salt, 1 teaspoon black pepper, smoked paprika, garlic powder, onion powder, and dried oregano.
Stir in the cooled cooked onions, garlic, and half of the par-cooked bacon pieces.
Add the 1.5 pounds of ground chuck into the bowl.
Using clean hands with fingers spread wide like rakes, gently fold the seasonings into the beef just until combined.
Do not knead or squeeze the meat like bread dough! Keeping your touch light ensures the interior stays juicy and tender rather than tight and dense.
Step 4: Stuff the Onion Vessels
Divide the seasoned beef mixture into equal portions according to how many onions you hollowed out.
Tuck a small cube of sharp cheddar cheese into the very bottom of each hollowed onion cavity.
Now, pack the seasoned ground chuck firmly into each onion, pressing it down gently into the sides to eliminate air pockets.
Fill the onions right up to the rim, leaving just a slight indentation at the very top for extra cheese later.
Step 5: The Foil Steam Shield
Brush the outside of each stuffed onion with melted butter and sprinkle the skins with a pinch of kosher salt and black pepper.
Tear off large, individual squares of heavy-duty aluminum foil (about 12×12 inches each).
Place one stuffed onion in the center of each sheet. Bring the four corners of the foil up over the top of the onion and twist or crimp tightly together to form a sealed packet.
The foil locks in natural onion moisture, braising the vegetable into sweet, buttery tenderness while gently cooking the ground beef from the outside in.
Step 6: The Low-and-Slow Steam Bake (Grill or Oven)
Place the foil-wrapped onion bombs on a rimmed baking sheet (or over indirect medium heat on a preheated grill at 375°F / 190°C).
- Cook sealed in foil for 35 to 40 minutes.
Around minute 35, carefully open one packet (watch out for escaping hot steam!) and insert your digital instant-read thermometer into the dead center of the meat filling:
- Target core reading: 150°F to 155°F (65°C to 68°C).
The outer onion should feel soft and give slightly when gently squeezed with heatproof tongs.
Step 7: The Uncovered Cheese & Bacon Char
Once the beef reaches 150°F, pull the pan from the oven (or slide packets off the grill).
Carefully tear or fold back the top of the foil on each packet, exposing the top of the cooked onion and beef (you can gather the foil into a shallow nest around the base to catch juices, just like the tray in the photo).
Spoon a small dollop of barbecue sauce over the top of the meat.
Now, mound the freshly shredded sharp cheddar cheese generously across the top opening of each onion.
Scatter the remaining crispy cooked bacon pieces over the cheddar.
- Oven Method: Switch your oven to BROIL (High). Place the uncovered onions on the upper rack, 6 inches below the heating element, for 3 to 4 minutes.
- Grill Method: Move the open foil packets directly over the hot side of the grill grates, close the lid, and let the radiant heat melt the cheese for 4 to 5 minutes.
Watch through the door or check frequently: the cheese will liquefy, bubble aggressively, and develop caramelized, blistered spots, while the exposed onion rim chars into a gorgeous, sweet, roasted mahogany brown.
Remove them immediately the moment the top looks bubbling and blistered.
Step 8: The Mandatory 5-Minute Rest
Set the hot tray on a wooden board or trivet.
Do not attempt to cut into them right away!
The bubbling cheddar is scorching hot, and the meat juices inside the onion chamber need a moment to settle.
Let the onion bombs rest undisturbed for 5 to 7 minutes.
During this rest, the melted cheese sets just enough to hold the bacon pieces in place, and the onion walls relax into a melt-in-your-mouth texture.
Slice down the middle with a sharp knife to reveal the steaming, juicy seasoned beef interior and the molten cheese pull.
Practical Troubleshooting & Common Mistakes
- “My onion was still crunchy when the beef was done.”
This happens if you cut through the foil or didn’t crimp the packet tightly. Steam is what cooks dense onion rings into soft, sweet petals. Make sure you use heavy-duty foil and create an airtight twist at the top so steam cannot escape during the first 35 minutes. - “The bottom of the onion burned black.”
If cooking on a grill, never place the foil packets directly over roaring flames. Always cook over indirect heat (burners off beneath the onions on a gas grill, or banked coals on the opposite side of a charcoal kettle) during the initial steam phase, moving them to direct heat only for the final 3-minute char. - “The cheese and meat slid out into the foil.”
This is the classic consequence of scooping out too many layers. Always leave at least two or three thick outer rings of the onion intact. Think of the onion as a heavy ceramic ramekin, not a single sheet of parchment.
Delicious Upgrades & Variations
- The Spicy Jalapeño Popper Bomb: Fold 2 tablespoons of cream cheese, diced pickled jalapeños, and pepper jack cheese directly into the beef filling before stuffing the onion.
- The French Bistro Bomb: Stuff the onion with seasoned ground chuck, fresh thyme, and Worcestershire sauce, and crown the top with freshly shredded Gruyère cheese instead of cheddar.
- The Smoked Pitmaster Version: If you own a pellet grill or smoker (like a Traeger), place the foil-wrapped onions at 275°F for 1 hour, then unwrap, add cheese and bacon, and crank the heat to 400°F for the final smoky finish.
What to Serve with Onion Bombs & Handling Leftovers
These bacon cheeseburger onion bombs are rich, hearty, and packed with flavor, making them the ultimate centerpiece for relaxed outdoor gatherings or game-day dinners:
- Crispy French Fries or Tater Tots: Perfect for dipping into any savory meat and barbecue juices that pool at the bottom of the foil.
- Grilled Corn on the Cob: Tossed with butter, cotija cheese, and lime juice for a sweet summer side.
- A Crisp, Vinegar-Based Coleslaw: Shredded cabbage tossed in apple cider vinaigrette brings a bright, crunchy acidity that cuts right through the rich beef, bacon, and melted cheese.
If you have leftovers, wrap each onion bomb individually in its foil and store in the refrigerator for up to 4 days.
Reheat by placing the foil packet into a 350°F (175°C) oven or toaster oven for 12 to 15 minutes until heated through to the center. The onion will turn even sweeter and more jammy the next day, making it the most satisfying leftover lunch you will ever eat.