I used to think whoever invented the “meatloaf roulade” was either a trained pastry chef or an absolute masochist.
A few years back, I wanted to show off for a casual weekend get-together. I had this grand vision of pulling a gorgeous, cylindrical meatloaf from the oven, slicing into it, and revealing a neat, spiral pinwheel of crispy bacon and molten cheddar cheese tucked inside seasoned beef. I had seen a short video online where someone rolled ground meat like a jelly roll in under ten seconds and made it look effortless.
My first attempt was complete chaos.
I pressed two pounds of ground beef out onto my bare counter, layered raw, slippery bacon and a mountain of pre-shredded cheddar over it, and tried to roll it with my bare hands. The meat tore into greasy chunks. When I finally patched the fissures and hoisted it into the oven, the real disaster started.
As the meat heated, the proteins contracted, the raw bacon trapped steam, and the cheese expanded violently. The side seams blew wide open. Half of the cheese spilled out onto the baking sheet, burning into black, acrid smoke on the oven floor, while the remaining meatloaf sat in a pool of grease, hollowed out and split down the middle. When I sliced it, it fell apart into sad, jagged clumps.
My friends were sweet about it and ate the crumbles with a fork, but I was humiliated.
It took me four more test runs to realize that rolling stuffed meat isn’t luck—it’s pure kitchen physics. You have to par-cook your bacon so it renders its grease beforehand, build a moisture-locking panade so the beef stays pliable, roll with parchment paper for structural support, and seal the edges like an airtight envelope.
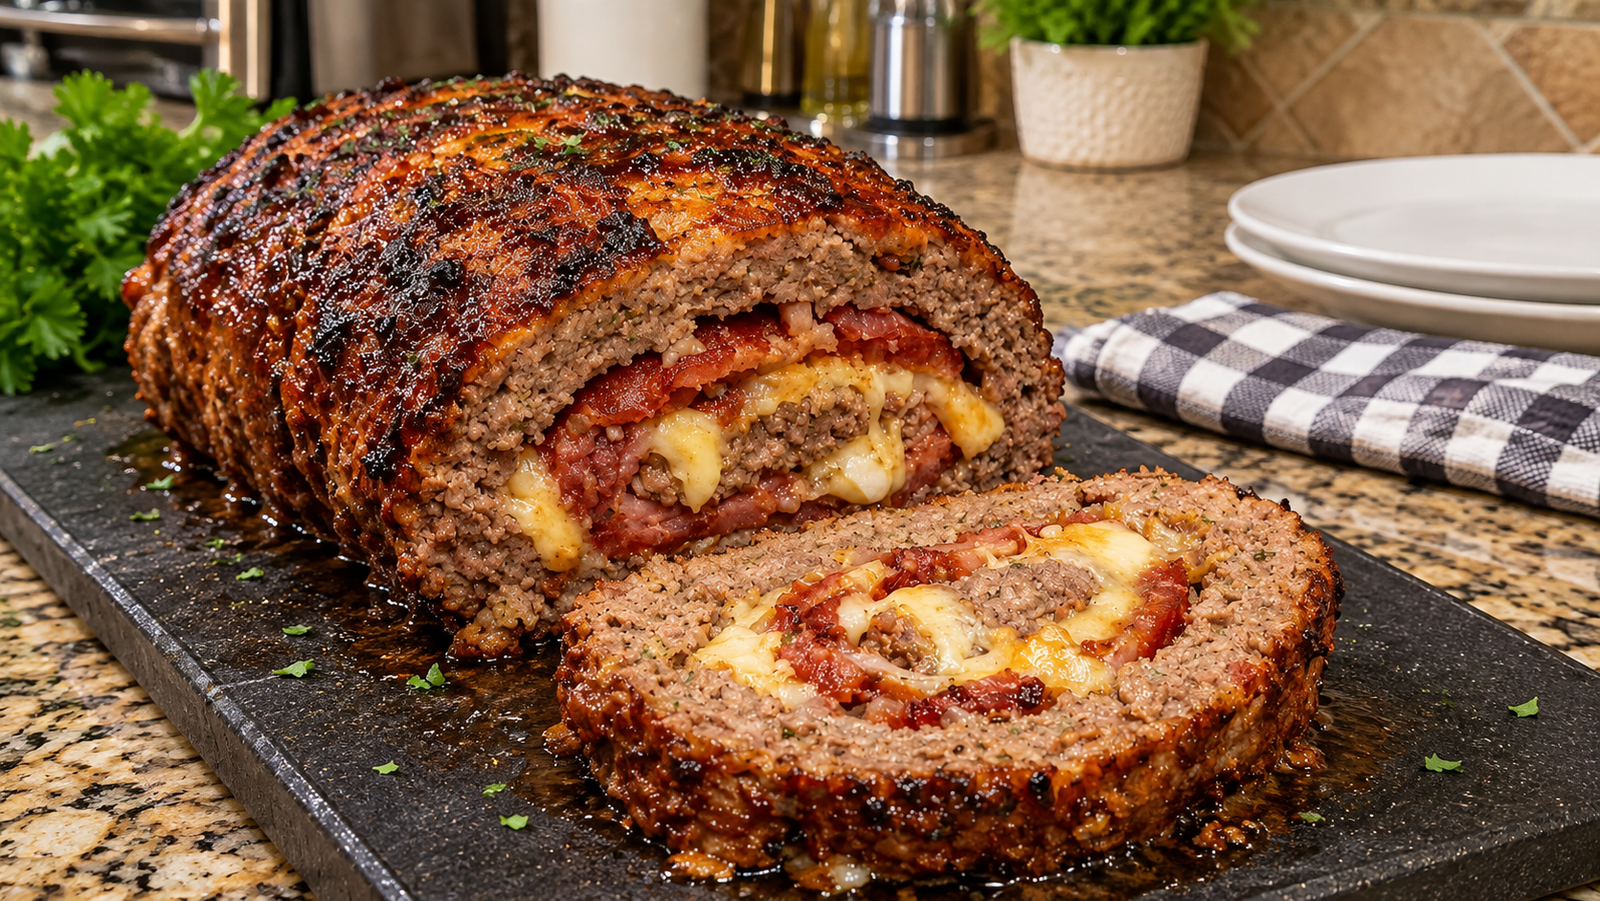
The photo above is the hard-earned victory: an evenly seasoned, juicy beef roll with a dark, caramelized outer bark, a tight internal spiral of smoky bacon, and a pocket of molten, gooey cheese that stays locked inside until you slice it on the board.
Here is how you make this show-stopping Bacon Cheeseburger Meatloaf Roll at home without a single blowout.
Why Meatloaf Rolls Burst (And How to Fix It)
Rolling ground meat around cheese and bacon introduces intense internal pressure. If your meatloaf roll has ever split or turned into a greasy soup, here is what happened behind the scenes:
1. The Raw Bacon Steam Trap
Never roll raw, cold bacon inside ground beef. Bacon requires dry heat and airflow to render its fat and turn crisp. If you wrap raw bacon inside raw beef, the steam released from the cooking beef boils the bacon from the inside out. That makes the bacon rubbery and creates large air pockets that cause the meatloaf layers to slide apart when sliced. Par-baking your bacon until it is lightly cooked and partially rendered solves the problem instantly.
2. High-Moisture Pre-Shredded Cheese
Pre-shredded cheese from a plastic pouch is coated in potato starch and cellulose to prevent sticking. That coating ruins smooth melting and causes the dairy fat to break into an oily yellow pool that blows out the seams. Using block sharp cheddar, Colby Jack, or provolone shredded by hand or sliced into thin strips melts into a cohesive, velvety spiral that stays put.
3. The Bare-Hand Rolling Mistake
Ground meat has no gluten. If you try to lift and roll a flat sheet of raw ground beef using just your fingers, it will crack and develop hairline fractures. Rolling the meat tightly with a sheet of heavy-duty parchment paper or plastic wrap—just like rolling sushi—gives you even, mechanical pressure, compressing the spiral without tearing the meat layer.
Ingredients & Tools You’ll Need
Essential Kitchen Gear
- Large Rimmed Half-Sheet Baking Pan: Lined with heavy-duty foil for easy cleanup and 360-degree airflow around the roll.
- Parchment Paper: Non-negotiable for shaping, pressing, and rolling the beef into a tight, seamless log.
- Digital Instant-Read Probe Thermometer: (A ThermoWorks ThermoPop or similar digital probe ensures you pull the beef at exactly 155°F to 160°F).
- Large Slicing Knife or Chef’s Knife: A sharp, long blade is essential to slice through the meat and bacon cleanly without crushing the molten cheese core.
The Ingredient Breakdown
| Component | Ingredient | Quantity | Practical Role |
| The Meat Base | 80/20 Ground Chuck | 2 lbs (900g) | Ideal fat content; stays juicy without shrinking into a dry block. |
| The Panade | Plain Panko Breadcrumbs | ¾ cup | Airy crumbs that cushion the beef fibers against contracting. |
| The Panade | Whole Milk (or Beef Bone Broth) | ½ cup | Hydrates the crumbs into a paste that locks in internal moisture. |
| The Binder | Large Eggs | 2 whole | Lightly beaten to hold the meat matrix together during rolling. |
| Aromatic Core | Yellow Onion | 1 medium (very finely minced) | Softened in butter before mixing so it doesn’t release raw water. |
| Aromatic Core | Fresh Garlic | 4 cloves (minced) | Delivers classic steakhouse and burger depth. |
| Savory Boosters | Worcestershire Sauce | 2 tbsp | Rich fermented umami that elevates the beefiness. |
| Savory Boosters | Tomato Paste & Yellow Mustard | 1 tbsp each | Classic burger condiments that add concentrated tang and color. |
| Smoky Rub | Smoked Paprika | 1 tsp | Enhances the smoky wood-pit aroma and colors the outer crust. |
| Savory Rub | Garlic Powder & Onion Powder | 1 tsp each | Dry spices cling directly to the meat for uniform flavor. |
| Seasoning | Coarse Kosher Salt & Black Pepper | 1.5 tsp salt, 1 tsp coarse pepper | Crucial seasoning across the beef layer and crust. |
| The Bacon Spiral | Thick-Cut Smoked Bacon | 8 to 10 strips | Par-baked until rendered and pliable before rolling. |
| The Molten Spiral | Sharp Cheddar & Provolone or Pepper Jack | 1.5 cups (freshly shredded or thin-sliced) | Melts into that gooey, stretchy golden swirl. |
| The Exterior Glaze | BBQ Sauce or Ketchup-Brown Sugar Glaze | ⅓ cup | Brushed across the outer crust to caramelize into a dark bark. |
Step-by-Step Cooking Instructions
Step 1: Par-Bake the Bacon
Preheat your oven to 375°F (190°C). Line a rimmed baking sheet with aluminum foil.
Lay your strips of bacon flat on the baking sheet without overlapping.
Bake for 8 to 10 minutes.
You do not want the bacon to turn hard or crispy yet! You want it par-cooked: the white fat should look soft and translucent, and roughly two tablespoons of grease should render out onto the pan.
Transfer the limp, pliable bacon strips onto paper towels to drain and cool.
Cook’s Tip: Par-baking expels that initial burst of liquid fat so it doesn’t drown the center of your meatloaf, while leaving the bacon flexible enough to roll cleanly into the spiral.
Step 2: Sauté the Aromatics
Melt 1 tablespoon of butter in a small skillet over medium-low heat.
Add the finely minced yellow onion and a pinch of salt. Cook gently for 5 to 7 minutes until the onion is soft, sweet, and translucent. Stir in the minced garlic and cook for 60 seconds until fragrant.
Remove from the heat and let the mixture cool for 5 minutes.
Never add raw, crunchy onions to a meatloaf roulade. Raw onions release steam as they cook, creating tiny vapor pockets that will tear your rolled meat layers apart.
Step 3: Build the Panade and Flavor Slurry
In your large mixing bowl, combine the ¾ cup of panko breadcrumbs with the ½ cup of whole milk (or beef broth). Stir and let it rest on the counter for 5 minutes until the breadcrumbs absorb all the liquid into a soft paste.
Crack the 2 eggs directly into the bowl with the soaked panko.
Add the cooled cooked onions and garlic, 2 tablespoons Worcestershire sauce, 1 tablespoon tomato paste, 1 tablespoon yellow mustard, 1 teaspoon smoked paprika, 1 teaspoon garlic powder, 1 teaspoon onion powder, 1.5 teaspoons kosher salt, and 1 teaspoon coarse black pepper.
Whisk thoroughly with a fork until you have a smooth, uniform seasoning paste.
Step 4: Mix the Beef Gently
Add the 2 pounds of ground chuck to the bowl with your seasoning paste.
Spread your fingers wide like rakes and gently fold the meat into the seasonings just until the panade is evenly distributed—about thirty to forty seconds.
Stop immediately once it comes together. Squeezing or kneading ground beef compacts the protein strands, resulting in a dense, rubbery roll instead of a tender, crumbly bite.
Step 5: Press the Meat Sheet onto Parchment
Tear off a large sheet of parchment paper (about 18 inches long) and lay it flat on your clean kitchen counter.
Dump the seasoned meat mixture onto the center of the parchment.
Using your hands, press and pat the beef out into a uniform, flat rectangle roughly 10 inches wide by 14 inches long, and about ½-inch thick.
Keep the thickness consistent from the center all the way to the edges. A flat, even layer of meat guarantees an even spiral and uniform cooking time.
Step 6: Layer the Bacon and Cheese
Now build your internal fillings:
- The Edge Border: Leave a clear 1-inch border of bare meat along the top edge and both sides, and a 2-inch border of bare meat along the far edge away from you. This bare border will act as your glue when sealing the roll.
- The Bacon Blanket: Lay your par-cooked bacon strips flat across the meat rectangle in an even layer.
- The Cheese Swirl: Scatter your freshly shredded sharp cheddar and provolone evenly across the bacon strips.
Step 7: The Sushi-Style Parchment Roll
Position the short end of the meat rectangle closest to your body.
Using the parchment paper to support the meat, lift the bottom edge up and begin rolling the meat snugly over the bacon and cheese fillings.
Peel the parchment paper back as you roll forward—do not roll the paper into the meat!
Keep the roll snug and compact, pulling the paper tight to compress the spiral as you go.
When you reach the far edge, roll the meat completely onto the bare border so the seam rests underneath the log.
Use your fingers to firmly pinch and smooth the long seam closed until it disappears completely.
Now, tuck and pinch both end caps securely, folding the meat inward to ensure the bacon and cheese are sealed inside an airtight capsule.
Smooth your hands along the outside of the cylinder, checking for any cracks. If you spot a thin area, gently press meat from the ends to reinforce it.
Step 8: Transfer and Glaze
Line a sturdy rimmed baking sheet with heavy-duty aluminum foil.
Using the parchment paper as a sling, gently transfer the rolled meatloaf onto the baking sheet, seam-side down. Slide the parchment paper out from underneath and discard it.
Brush your favorite barbecue sauce or sweet-tangy glaze across the entire top and sides of the roll.
This glaze caramelizes under the oven heat, creating that deep, mahogany roasted bark seen in the reference shot.
Step 9: Bake and Rest
Preheat your oven to 375°F (190°C).
Slide the uncovered baking sheet onto the middle rack and bake for 45 to 50 minutes.
Around minute 45, insert your digital probe thermometer into the center of the meat roll:
- Target internal temperature: 155°F to 160°F (68°C to 71°C).
Pull the pan out of the oven.
Transfer the meatloaf roll gently using two wide spatulas onto a wooden or heavy-duty cutting board.
The Non-Negotiable 15-Minute Rule: Do not touch this roll with a knife right now! If you slice into it while it’s piping hot, the molten cheese inside will violently gush out onto the board, leaving your slices completely hollow.
Let the roll rest undisturbed on the cutting board for 12 to 15 full minutes.
During this rest, the internal steam pressure settles, the beef reabsorbs its savory juices, and the melted cheese cools down just enough to form a cohesive, silky ribbon that clings to the bacon and beef in every slice.
Using a very sharp chef’s knife or long slicing knife, carve the roll into thick, clean ¾-inch to 1-inch slices, revealing that gorgeous internal pinwheel.
Practical Troubleshooting & Common Mistakes
- “My cheese still leaked out onto the pan.”
This happens if you roll the cheese too close to the edges or leave hairline cracks in the raw meat. Always leave that 1-inch bare border around the perimeter, and spend an extra minute smoothing the seams with damp fingers before baking. - “The meatloaf broke apart when I tried to carve it.”
This usually means the roll was sliced while screaming hot, or the knife was dull. Let the meat rest for the full 15 minutes, and use smooth, gentle sawing strokes with a very sharp blade rather than pressing down hard. - “There is liquid fat around the base of the roll.”
An 80/20 chuck blend naturally renders flavorful fat and pan juices as it cooks. That is completely normal! That’s why we bake on a flat, rimmed baking sheet—the rendered fat drains away from the meat instead of boiling the roll like a loaf pan would.
What to Serve with It & Next-Day Upgrades
This bacon cheeseburger roll is rich, savory, and pure comfort food, making it the star of the table:
- Crispy French Fries or Tater Tots: Keeps the classic cheeseburger theme alive and gives you something to dip into extra burger sauce.
- A Tangy Chopped Wedge Salad: Crisp iceberg lettuce, diced tomatoes, and blue cheese dressing cut through the richness of the bacon and cheddar.
- Grilled Corn on the Cob: Sweet summer corn tossed with butter and sea salt balances the smoky beef.
If you have leftover slices, wrap them securely in foil and keep them in the refrigerator for up to 4 days.
Because the bacon and cheese firm up overnight, cold leftover slices hold their shape like steak.
For the ultimate next-day lunch, melt a dab of butter in a cast-iron skillet, lay a slice of the meatloaf roll flat in the pan, and fry for 3 minutes per side until the edges crisp up and the cheese core melts into gooey perfection again. Slide it onto a toasted brioche bun with a smear of garlic aioli and dill pickles for the best burger-style sandwich you will ever eat.