
I still remember the summer potluck disaster that made me hide my dessert dish under a dish towel in the trunk of my car.
I had volunteered to bring dessert to a family reunion on a blazing hot Saturday in July. I wanted to combine two Southern heavyweights: classic vanilla wafer banana pudding and fresh strawberry shortcake. I figured it was foolproof—just slice up a bunch of ripe bananas and juicy strawberries, layer them with boxed instant vanilla pudding and canned whipped cream into a glass pan, and chill it.
By the time we opened the dessert table three hours later, it looked like a crime scene.
The strawberries had macerated under the sugar, expelling an ocean of thin red juice that flooded the bottom of the dish. The bananas, fully exposed to air and fruit acid, had oxidized into mushy, slime-grey coins. The canned whipped cream had broken down into runny liquid, and the vanilla wafers had dissolved into a texture eerily close to wet cardboard. When my cousin tried to scoop a portion, it splashed onto her plate like strawberry-banana soup. I was so embarrassed I quietly slid the dish into the trash before dessert was even over.
That failure drove me crazy because strawberry-banana is an elite flavor combination.
When you get it right, you get velvety vanilla cream, the sweet buttery crunch of vanilla wafers, floral ripe strawberries, and creamy bananas that hold their bite without turning brown.
It took me several testing rounds in my favorite deep square glass dish to get the food chemistry dialed in. The secret isn’t fancy cooking; it’s moisture control, a stabilized cream cheese pudding mousse, and a simple citrus bath for the fruit.
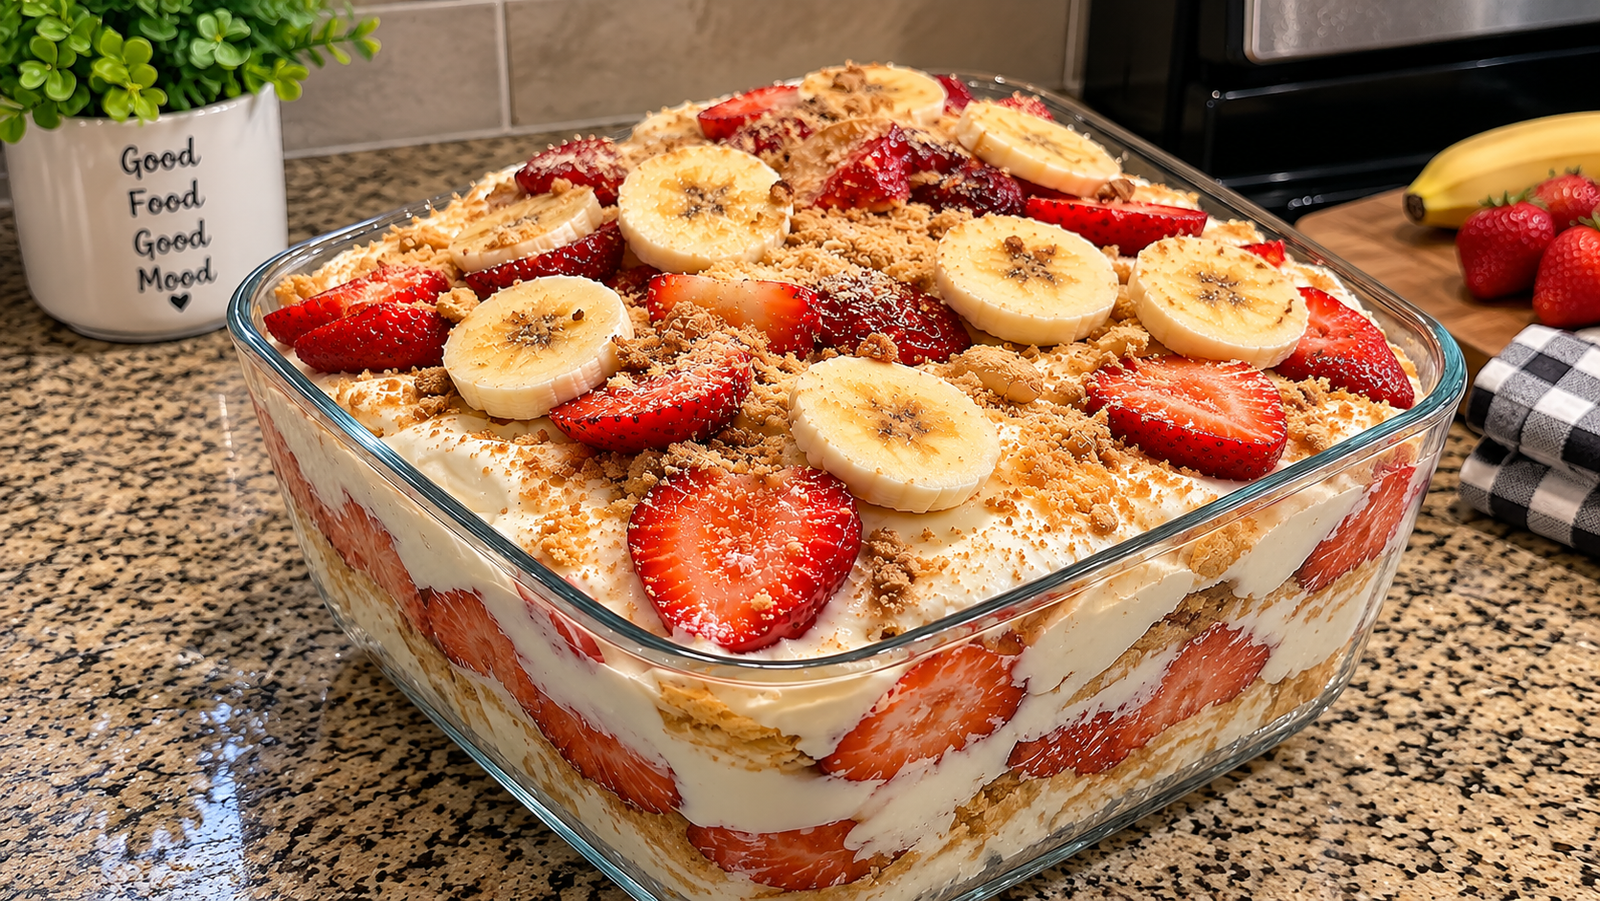
The photo above shows the finished triumph on my kitchen counter: a deep, clear glass dish showing off distinct layers of cream, wafers, ruby-red strawberries, and bright, intact banana slices, crowned with a dusting of toasted wafer crumbs that stays light and creamy for days.
Here is how you make this crowd-pleasing, no-bake icebox dessert at home without turning it into a watery puddle.
Why Fruit-Loaded Pudding Cakes Turn to Soup (And the Science to Fix It)
Layering fresh fruit into dairy-heavy puddings is a battle against enzymes and moisture. Here is why most recipes collapse:
1. The Strawberry Water Bleed
Strawberries are roughly 91% water. The moment you slice fresh strawberries and introduce them to sugar or pudding, osmosis kicks in. The sugar draws water out of the berry cells, causing the fruit to weep liquid. If you dump wet, freshly washed strawberries directly into pudding, that water will thin out your custard within two hours. Slicing the berries and gently blotting them dry on paper towels before layering keeps the moisture under control.
2. The Banana Oxidation Problem
Bananas contain polyphenol oxidase, an enzyme that turns the fruit flesh brown and soft when exposed to oxygen. Tossing your sliced banana coins in a quick splash of fresh pineapple juice or diluted lemon juice coats the surface in ascorbic acid, preventing enzymatic browning without altering the sweet banana flavor.
3. Flimsy Instant Pudding vs. Stabilized Cream Cheese Mousse
Standard instant pudding whisked with milk stays relatively soft. Under the heavy weight of sliced fruit and softening cookies, it turns slack and soupy. Folding softened cream cheese and whipped heavy cream into sweetened condensed milk and French vanilla pudding creates a rich, stabilized mousse. It sets firmly enough to slice into neat squares while remaining as light as a cloud.
Ingredients & Tools You’ll Need
Essential Gear
- Deep 8×8-inch or 9×9-inch Square Glass Baking Dish (or 9×13 Casserole): (A clear tempered glass dish, like the one in the photo, is essential so everyone can admire the colorful, contrasting fruit and cream layers).
- Stand Mixer or Electric Hand Mixer: For whipping the heavy cream to stiff peaks and beating the cream cheese smooth.
- Large Rubber Spatula: For gently folding the whipped cream into the pudding without deflating the air pockets.
- Paper Towels: For blotting the sliced strawberries completely dry.
- Rolling Pin & Zip-Top Bag: For crushing extra vanilla wafers into a golden streusel crumb topping.
The Ingredient Breakdown
| Component | Ingredient | Quantity | Practical Role |
| The Crunch Layer | Classic Nilla Wafers (or Graham Crackers) | 1 box (11 oz, divided) | Softens into a cake-like crumb while absorbing sweet cream. |
| The Red Berry | Fresh Strawberries | 1 lb (hulled and sliced lengthwise) | Bright, sweet-tart contrast to the rich vanilla pudding. |
| The Cream Fruit | Firm Yellow Bananas | 3 to 4 medium (sliced into ⅓-inch coins) | Creamy sweetness; use ripe bananas with barely any brown spots. |
| Anti-Browning Bath | Fresh Lemon Juice or Pineapple Juice | 1 tbsp (diluted in 2 tbsp water) | Keeps the banana slices bright and ivory-colored for days. |
| Mousse Base | Cream Cheese (Full-Fat) | 8 oz (1 block, room temperature) | Stabilizes the pudding and adds subtle cheesecake tang. |
| Mousse Sweetener | Sweetened Condensed Milk | 1 can (14 oz, cold) | Brings rich, silky sweetness and body to the cream base. |
| The Pudding Flavor | Instant French Vanilla Pudding Mix | 1 package (3.4 oz) | French vanilla has deeper egg-custard notes than plain vanilla. |
| Pudding Liquid | Whole Milk | 1 cup (ice cold) | Whisked with the pudding mix into a thick custard. |
| The Cloud Layer | Heavy Whipping Cream | 2 cups (ice cold) | Whipped to stiff peaks to give the mousse its airy, billowy lift. |
| Flavor Lift | Pure Vanilla Extract | 1.5 tsp | Rounds out the dairy with warm bakery aroma. |
| The Garnish | Reserved Crushed Wafers | ½ cup (coarsely ground) | Dusted over the top for a golden, textured crunch. |
Step-by-Step Assembly Instructions
Step 1: Prep and Dry the Fruit
Rinse your fresh strawberries thoroughly under cold water.
Before slicing, pat them bone-dry with paper towels. Slice the green tops off, then slice each strawberry lengthwise into uniform ¼-inch thick slabs.
Spread the sliced berries out in a single layer over two layers of dry paper towels. Let them sit on the counter while you build the cream; the paper towels will absorb excess surface moisture so your layers stay crisp and clean.
Peel your bananas and slice them into uniform ⅓-inch thick rounds.
Place the banana coins in a shallow bowl, drizzle with the diluted lemon or pineapple juice, and gently toss with your fingertips to coat. Drain on a paper towel.
Step 2: Whisk the Pudding Base
In a medium bowl, whisk together the 1 cup of cold whole milk and the 3.4-ounce packet of instant French vanilla pudding mix.
Whisk vigorously for 2 full minutes until completely smooth and starting to thicken.
Set the bowl in the refrigerator for 5 minutes to firm up into a soft custard.
Step 3: Beat the Cream Cheese Foundation
In a large mixing bowl (or the bowl of a stand mixer fitted with the paddle attachment), beat the 8 ounces of softened cream cheese on medium-high speed for 2 to 3 minutes until fluffy and free of lumps.
Scrape down the sides of the bowl with a spatula.
Turn the mixer to low and slowly stream in the cold can of sweetened condensed milk, followed by the pure vanilla extract.
Beat until velvety and uniform.
Add the chilled vanilla pudding from Step 2 into the cream cheese mixture, beating on medium speed for 1 minute until completely combined into a thick, glossy cream.
Step 4: Whip the Heavy Cream
In a separate chilled metal or glass bowl, pour in the 2 cups of ice-cold heavy whipping cream.
Using a hand mixer or stand mixer fitted with the whisk attachment, beat the cream on high speed for 3 to 4 minutes until stiff peaks form.
You want the cream thick enough to hold its shape firmly when you lift the beaters.
Step 5: Fold into Pillowy Mousse
Using your large rubber spatula, spoon about one-third of the whipped cream into the bowl with the cream cheese pudding base.
Stir it in gently to lighten the density of the pudding.
Now, add the remaining whipped cream.
Gently fold using a sweeping motion: cut down the center of the bowl with your spatula, sweep along the bottom, and fold over the top, rotating the bowl as you go.
Fold just until no white streaks remain.
The result is a luscious, stabilized vanilla cream mousse that tastes like melted vanilla bean ice cream.
Step 6: The Architectural Layering
Set your deep square glass baking dish on the counter. Assemble your icebox cake in deliberate layers:
- The Wafer Foundation: Cover the bottom of the dish with a solid, single layer of whole Nilla Wafers, flat-side down. (Fill any small empty gaps with broken wafer pieces).
- The First Cream Layer: Spoon roughly one-third of the vanilla mousse over the cookies, using an offset spatula to smooth it into an even blanket.
- The First Fruit Bed: Arrange a layer of sliced strawberries and banana coins across the cream. (To achieve that bakery-window look in the photo, press several strawberry slices flat against the clear glass walls so the bright red cross-sections show through from the outside).
- The Second Cookie Layer: Lay another layer of vanilla wafers across the fruit.
- The Second Cream Layer: Smooth another third of the vanilla mousse over the cookies.
- The Second Fruit Bed: Add another generous layer of sliced bananas and strawberries.
- The Cloud Top: Spread the remaining mousse across the top, swirling it into gentle, billowy peaks.
- The Crown: Arrange fresh strawberry halves and banana coins across the top cream layer in an alternating pattern.
Take your reserved half-cup of vanilla wafers, place them inside a zip-top bag, and crush them into coarse crumbs with a rolling pin.
Scatter the golden wafer crumbs generously across the top surface, letting the golden crumbs settle between the fruit slices (just like the gorgeous presentation in the photo).
Step 7: The Mandatory 4-Hour Icebox Chill
Do not scoop into this dish immediately!
While it looks tempting right now, an icebox cake requires time in the cold to transform.
Cover the glass dish loosely with plastic wrap (taking care not to smash the fruit on top) and refrigerate for at least 4 hours, or preferably overnight.
During this rest:
- The crisp, dry vanilla wafers drink in the surrounding cream, softening into tender, cake-like layers that slice like sponge cake.
- The cream cheese pudding mousse sets up into a firm, sliceable custard.
- The natural sweetness of the bananas and strawberries infuses the vanilla cream.
When ready to serve, use a large metal spoon to scoop deep into the dish, pulling up clean, towering portions with every single layer intact.
Practical Troubleshooting & Common Mistakes
- “My pudding turned grainy or lumpy.”
This happens if your cream cheese was cold when you started mixing. Cold cream cheese refuses to blend smoothly with cold milk, breaking into stubborn white curds. Always make sure your cream cheese sits on the counter for at least an hour to come to true room temperature before beating. - “The cookies on the bottom stayed crunchy.”
If you serve the dessert after only an hour or two, the wafers haven’t had enough time to absorb moisture from the cream. Give the dish its full 4 to 6 hours in the refrigerator so the cookies soften into that classic cake-like texture. - “Water pooled at the bottom of the dish the next day.”
This is the hallmark of wet strawberries. Never wash cut strawberries, and never sprinkle sugar on the sliced berries beforehand. Sugar draws out liquid through osmosis. Wash the berries whole, dry them thoroughly, slice, and blot them on paper towels before assembly.
Flavor Twists & Upgrades
- The Chocolate Drizzle Touch: Warm 2 tablespoons of Nutella or dark chocolate fudge sauce and drizzle it in thin lines over the crushed wafer topping right before serving.
- Graham Cracker Cheesecake Version: Swap the vanilla wafers for classic honey graham crackers or cinnamon grahams for a bolder, cheesecake-style crust.
- Toasted Pecan Crunch: Toss ½ cup of finely chopped, toasted pecans into the crushed wafer crumb topping for a buttery, nutty crunch that pairs naturally with bananas.
How to Store Leftovers
Store any remaining pudding cake covered tightly with plastic wrap in the refrigerator for up to 3 days.
Because we stabilized the pudding base with cream cheese and gave the bananas a citrus bath, this dessert holds up remarkably well without turning grey or watery overnight.
In fact, digging into a cold bowl of leftover strawberry-banana pudding the following afternoon—when the cookies have softened completely into tender sponge cake and the flavors have deepened—might be the best part of the entire week.