I will never forget the Thanksgiving potluck that completely broke my relationship with classic green bean casserole.
I was twenty-four, eager to impress my partner’s extended family, and volunteered to bring the vegetables. Everyone said green bean casserole was foolproof, so I followed the classic recipe printed on the back of the fried onion tub: two cans of watery French-cut green beans, a can of condensed cream of mushroom soup, a splash of milk, and a handful of canned fried onions dumped on top right at minute zero.
It was an unmitigated disaster.
By the time I drove thirty minutes to dinner and pulled the dish out of my insulated carrier, the fried onions on top had absorbed steam and dissolved into a slimy, grey sludge.
Worse, the water trapped inside the canned green beans had thinned out the condensed soup into a lukewarm, murky grey pool. When people spooned it onto their plates, it spread across the porcelain like swamp water, invading the mashed potatoes and soaking the turkey skin. My partner’s aunt took one look at it, gave me a sympathetic pat on the shoulder, and said, “Bless your heart, at least you tried.”
I wanted to crawl under the dining room table and disappear.
That soggy mess haunted me for years. At its core, the flavor profile of green bean casserole is holiday nostalgia at its finest: crisp-tender green beans, an earthy, garlic-spiked wild mushroom cream sauce, sharp melted cheddar, and that shatteringly crisp, salty crunch of toasted French fried onions across the top. But relying on canned mush and condensed gelatinous soup will break your heart every single time.
I spent the next three holiday seasons rebuilding this dish from the ground up: blanching fresh green beans to lock in their emerald color and snap, making a silky homemade garlic mushroom béchamel, and mastering the two-stage bake so the fried onions stay blisteringly crisp.
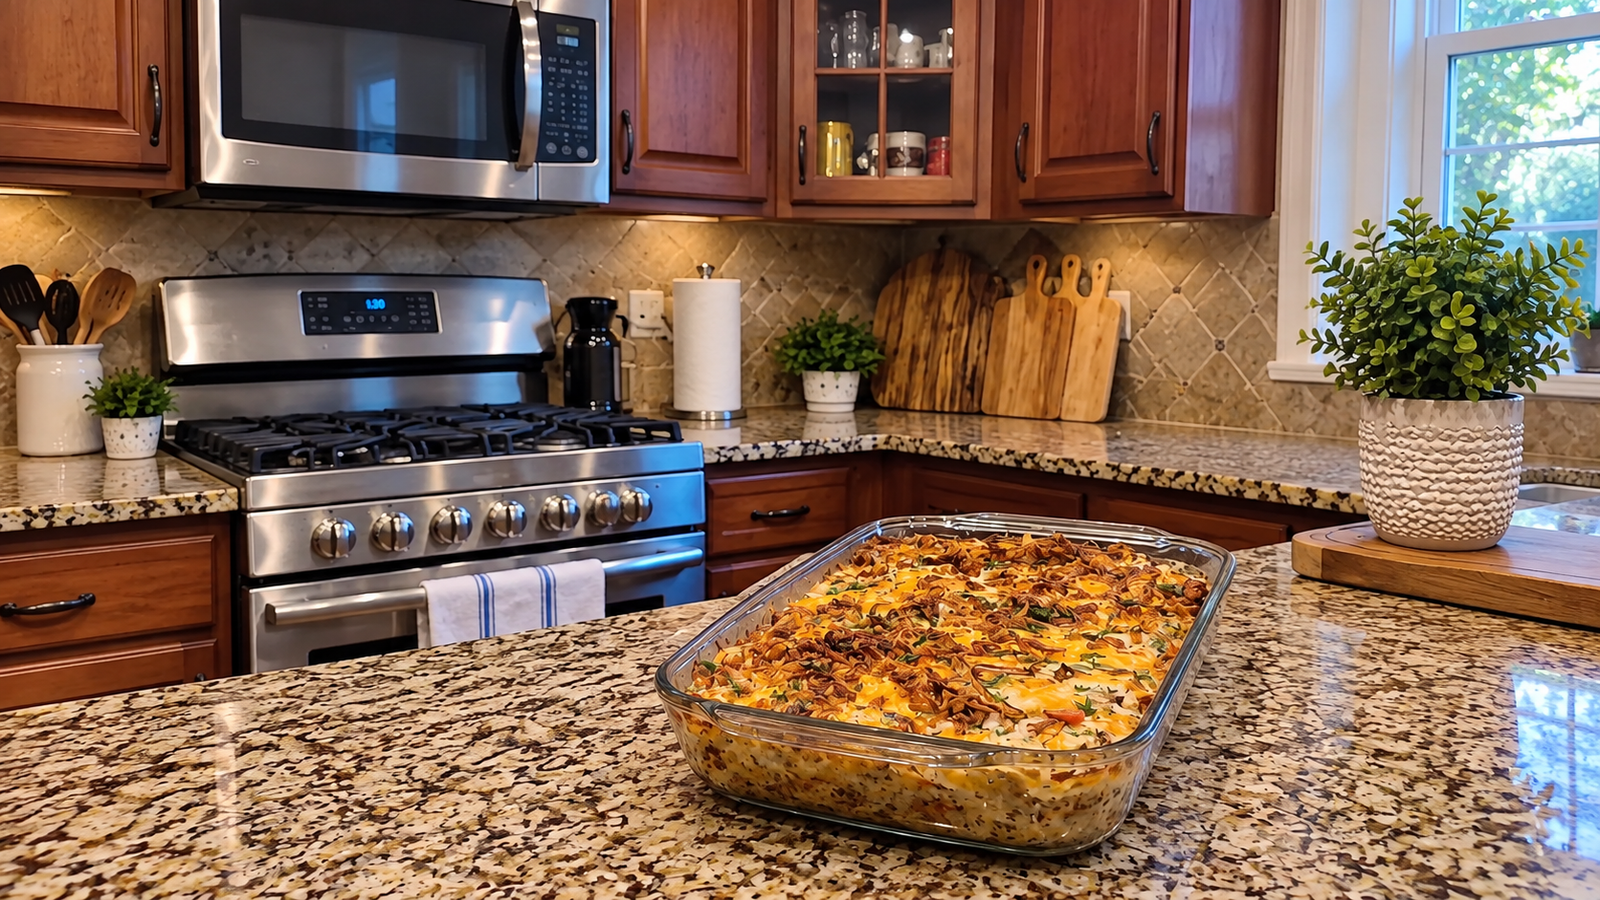
The photo above is the hard-won standard sitting on my kitchen counter: a deep 9×13 glass baking dish bubbling with creamy, herb-flecked sauce, studded with tender-crisp beans and sweet aromatics, crowned with a golden blanket of melted cheddar and crunchy, deeply toasted French fried onions.
Here is how you make the green bean casserole people will genuinely fight over at your next holiday table.
Why Traditional Green Bean Casseroles Turn into Mush
Most holiday casserole tragedies boil down to excess water and bad timing. Here is why the old-school canned version fails:
1. Canned Beans Are Already Overcooked
Green beans sealed inside a metal can sit in salted brine for months. By the time they reach your kitchen, their cell walls have collapsed, turning them limp, olive-drab, and waterlogged. When baked for another thirty minutes, they turn into purée. Using fresh, snappy green beans—trimmed and blanched in boiling salted water for exactly four minutes—preserves their vibrant snap and bright green hue even after baking in the oven.
2. The Trap of Canned Condensed Soup
Canned cream of mushroom soup relies heavily on modified cornstarch and stabilizers. When mixed with vegetable moisture in a baking dish, it breaks down and turns watery or develops a gelatinous film. Building a five-minute stovetop roux with fresh sautéed cremini mushrooms, garlic, butter, and heavy cream creates an unctuous, luxurious sauce that clings to every bean without separating.
3. Adding Crispy Onions at the Beginning
French fried onions are delicate, deep-fried slivers of real onion. If you put them on top of a wet casserole at the start of a 30-minute bake, they act like a sponge for all the rising steam. They become soggy, limp, and bitter. The fix is simple: bake the casserole on its own until bubbling hot, and add the fried onions and cheese during the final eight minutes of cooking so they toast into a shatteringly crisp crust.
Ingredients & Kitchen Tools
Essential Gear
- 9×13-Inch Deep Glass Casserole Dish: (A clear tempered glass dish, like the one pictured on the counter, distributes heat evenly and lets you see the sauce bubbling along the bottom edges).
- Large 6-Quart Stockpot & Large Slotted Spoon: For blanching the fresh green beans.
- Large Mixing Bowl Filled with Ice Water: An ice bath is mandatory to shock the beans and stop the cooking process instantly.
- 12-Inch Skillet: For sautéing fresh mushrooms and building your homemade cream sauce.
- Whisk: Essential for creating a silky-smooth mushroom roux without lumps.
The Ingredient Breakdown
| Component | Ingredient | Quantity | Practical Purpose |
|---|---|---|---|
| The Star Vegetable | Fresh Stringless Green Beans | 2 lbs (900g, ends trimmed, snapped in half) | Fresh snap and bright green color that won’t turn to mush. |
| The Mushroom Base | Fresh Cremini (Baby Bella) Mushrooms | 8 oz (finely diced or sliced) | Delivers deep, earthy umami that canned soup simply cannot match. |
| Aromatic Sweetness | Yellow Onion | 1 medium (finely diced) | Softened in butter to build the sauce base. |
| Aromatic Sweetness | Red Bell Pepper or Pimento | ½ cup (finely diced) | Adds festive red flecks, sweetness, and juicy texture throughout. |
| Aromatic Punch | Fresh Garlic | 4 cloves (minced) | Delivers robust savory depth. |
| The Sauce Fat | Unsalted Butter | 4 tbsp (half a stick) | Used to sauté the aromatics and build the roux base. |
| The Thickener | All-Purpose Flour | ¼ cup | Blends with butter to thicken the homemade cream sauce. |
| The Sauce Liquids | Low-Sodium Chicken or Vegetable Broth | 1.5 cups | Lightens the sauce and adds savory background notes. |
| The Sauce Liquids | Heavy Cream or Half-and-Half | 1 cup | Creates that velvety, rich, spoon-coating texture. |
| Savory Boosters | Worcestershire Sauce | 1.5 tbsp | Rich fermented umami that elevates the mushrooms. |
| Savory Boosters | Dijon Mustard | 1 tsp | Subtle tang that cuts through the heavy cream. |
| Savory Boosters | Fresh Thyme Leaves | 1 tsp (finely chopped) | Woodsy herbal aroma that complements fresh mushrooms. |
| Seasoning | Coarse Kosher Salt & Cracked Pepper | 1.5 tsp salt, 1 tsp black pepper | Seasoned throughout the blanching water, sauce, and topping. |
| The Cheesy Blanket | Sharp Cheddar Cheese | 1.5 cups (freshly shredded from the block) | Melts into rich, gooey, golden pockets across the top. |
| The Crunch Crown | French’s Crispy Fried Onions | 1.5 to 2 cups | Non-negotiable crispy, salty, toasty crunch topping. |
Step-by-Step Cooking Instructions
Step 1: The Four-Minute Green Bean Blanch
Preheat your oven to 375°F (190°C). Lightly grease your 9×13 glass baking dish with butter or nonstick cooking spray.
Fill your 6-quart stockpot with water and bring it to a vigorous, rolling boil over high heat. Add 2 tablespoons of kosher salt (the water should taste like mild seawater).
Prepare a large bowl next to the stove filled with cold tap water and two trays of ice cubes.
Drop your trimmed, snapped fresh green beans into the boiling water.
Set a timer for exactly 4 minutes.
The beans will turn a vibrant, neon emerald green.
The moment the timer rings, use a large slotted spoon or spider strainer to scoop the beans out of the boiling water and plunge them immediately into the ice bath.
Cook’s Tip from My Kitchen: Plunging hot vegetables into ice water is called “shocking.” It halts the internal cooking process instantly, setting the bright green chlorophyll and locking in that crisp-tender snap.
Let the beans sit in the ice bath for 3 minutes until completely cold to the touch. Drain them thoroughly in a colander, then spread them out on a clean kitchen towel to dry.
Excess water on your beans will dilute your sauce, so make sure they are dry!
Step 2: Sauté the Mushrooms and Aromatics
Place your 12-inch skillet over medium heat and melt the 4 tablespoons of unsalted butter.
Add the finely diced cremini mushrooms and a pinch of kosher salt.
Cook undisturbed for 3 minutes so the mushrooms brown on the bottom, then stir and cook for another 4 minutes until their moisture evaporates and they turn deep golden-brown.
Toss in the diced yellow onion and finely diced red bell pepper. Cook for 4 to 5 minutes until the vegetables soften and turn sweet.
Stir in the minced garlic and fresh thyme leaves during the final minute just until fragrant.
Step 3: Build the Homemade Velvet Sauce
Sprinkle the ¼ cup of all-purpose flour evenly over the sautéed vegetables in the skillet.
Stir constantly with a wooden spoon for 1 to 2 minutes to cook out the raw flour taste. The mixture will look like a thick, nutty vegetable paste.
Slowly pour in the 1.5 cups of low-sodium chicken broth in a steady stream while whisking continuously to smooth out any clumps.
Once incorporated, whisk in the 1 cup of heavy cream, 1.5 tablespoons Worcestershire sauce, 1 teaspoon Dijon mustard, 1 teaspoon kosher salt, and ½ teaspoon freshly cracked black pepper.
Bring the sauce to a gentle simmer over medium heat, stirring frequently.
Let it bubble softly for 3 to 4 minutes. It will thicken into a rich, velvety, glossy mushroom gravy that easily coats the back of a spoon.
Remove the skillet from the heat. Taste the sauce: it should be bold, savory, and rich.
Step 4: Fold and Transfer
Take your blanched, dried green beans and transfer them into your 9×13 glass casserole dish.
Pour the hot mushroom cream sauce directly over the beans.
Add ½ cup of the freshly shredded sharp cheddar cheese and ½ cup of the crispy fried onions directly into the mixture.
Using two spoons or a spatula, toss everything together inside the dish until every green bean is coated in that rich mushroom gravy and the cheese and onions are distributed evenly throughout the layers.
Spread the mixture out into a flat, uniform bed across the glass dish.
Step 5: The First Bake (Heating the Core)
Slide the uncovered glass dish onto the center rack of your preheated 375°F (190°C) oven.
Bake untouched for 20 minutes.
At this stage, you are allowing the green beans to warm through and the thick mushroom sauce to start bubbling vigorously around the edges of the dish.
Step 6: The Golden Crunch Crown
Carefully pull the baking dish out of the oven using heatproof mitts.
The sauce will be actively simmering and bubbling along the clear glass sides.
Now, scatter the remaining 1 cup of freshly shredded sharp cheddar cheese evenly across the entire bubbling surface.
Cover the cheese completely with the remaining 1 to 1.5 cups of crispy French fried onions, spreading them into an edge-to-edge mantle.
Return the dish to the oven and bake for an additional 6 to 8 minutes.
Keep a close eye on it through the oven door: the cheese will melt into gooey ribbons, and the fried onions will toast into a deep, fragrant, golden-brown crunch without scorching.
Pull the dish out the moment the top looks toasted and bubbling, exactly like the photo.
Step 7: The Essential 10-Minute Rest
Set the hot glass casserole on a wooden trivet or heatproof kitchen counter.
Resist the urge to plunge a serving spoon in immediately!
A bubbling cream casserole straight out of a 375°F oven is very loose.
Let it rest undisturbed on the counter for 8 to 10 minutes.
During this rest, the starches in the sauce settle, the bubbling slows, and the melted cheese sets just enough to hold everything together.
When you scoop it out, you’ll get neat, generous portions with thick, clingy sauce and a distinct, crispy onion crunch in every single bite.
Practical Troubleshooting & Common Mistakes
- “My fried onions burned to a crisp.”
French fried onions burn fast because they are already fried. Never add them at the start of the bake. Always wait until the final 6 to 8 minutes of baking. If your oven has aggressive top heating elements, tent a loose sheet of foil over the dish if the onions look dark before the cheese is fully melted. - “The sauce separated or looked greasy.”
This happens if you use pre-shredded cheese coated in potato starch, or if you boiled the heavy cream on high heat. Always shred block cheddar by hand, and keep the stovetop simmer gentle when thickening the roux in Step 3. - “The beans are too tough or squeaky.”
Some thicker garden beans need an extra minute of blanching. When blanching in Step 1, pull one bean out at minute 4 and bite it: it should be tender with just a firm, crisp center. If it feels too stiff to bend easily, let them boil for 5 minutes total before shocking them in ice water.
Make-Ahead Instructions for Stress-Free Holidays
This casserole is a lifesaver during Thanksgiving or holiday entertaining because you can assemble almost the entire dish up to 24 hours in advance:
- Blanch and shock the green beans, make the mushroom sauce, and fold them together in the glass dish with the half-cup of cheese (do not add the fried onions).
- Cover the dish tightly with foil and place it in the refrigerator.
- On dinner day, pull the dish out of the fridge 30 minutes before baking to take the chill off the glass.
- Bake covered with foil at 375°F for 20 minutes, uncover, top with the cheddar and crispy fried onions, and bake uncovered for another 10 to 12 minutes until bubbling and golden.
What to Serve with It & Handling Leftovers
This dish is the quintessential holiday companion, but it’s just as incredible for a casual Sunday supper:
- Herb-Roasted Turkey or Brown Sugar Glazed Ham: The creamy, earthy mushrooms and savory beans cut through rich, savory holiday meats.
- Creamy Mashed Yukon Golds: Spoon extra mushroom sauce directly over fluffy potatoes.
- Warm Cast-Iron Cornbread: Perfect for cleaning your plate of any remaining savory cream sauce.
If you have leftovers, transfer them to an airtight container and store in the refrigerator for up to 4 days.
To reheat while keeping the fried onions crispy, avoid the microwave. Place your portion in an oven-safe dish or toaster oven at 350°F (175°C) for 10 minutes (or in an air fryer at 320°F for 4 minutes). The onions will re-crisp, the cheddar will melt, and the beans will taste just as fresh and snappy as day one.